
Thursday, October 25, 2012
Legs and Arms
drawing and cutting out

Starting

Tuesday, September 11, 2012
Mechanical Toys
Today I explored the mechanical toys progam and got to see which ones look challenging but fun. I think I am really interested in the T-Rex and the Gobbler. I really like these because I think it would be fun if you use the hand machine and a electronic machine. If I did one of these I would change the color to pink and would give it to my 11 month old niece.
Sunday, August 26, 2012
assessment:
CAD/CAM design hasn't always been the same. People have been designing for a long time. Early humans created tools from materials they found in nature, including wood, bone and stone. In fact, whole epochs of history have been named after the most common materials used to make tools: the Stone Age, the Bronze Age and the Iron Age. The creation of tools made survival possible. They used to hunt, make shelter and clothing, and sometimes small ornaments or jewelry. To make a tool, someone had to imagine something that did not yet exist. In other words- design. (A short History of Design and Technology, 2005, pg. 1). CAD stands for computer aided design and is software used in art and architecture, and engineering and manufacturing to assist in precision drawing. CAM stands for computer aided manufacturing and CAD/CAM is computer systems used to design and manufacture products. The term CAD/CAM implies that an engineer can use the system both for designing a product and for controlling manufacturing processes. For example, once a design has been produced with the CAD component, the design itself can control the machines that construct the part.
Advantages of CAD/CAM:
Disadvantages of CAD/CAM:
As you can see there has been a variety of changes to the CAD/CAM design to become what it is today.
Advantages of CAD/CAM:
- Can be easily erased and changed
- Can be zoomed in for more detailed sections
- Can be copied and pasted many times
- Depending on skill, can be neater
- Can be quicker
- Can be sent to elsewhere quickly
- Can be stored in a safe place
- Can be checked for measurements by the computer
- Can easily mass produce identical products
- Can work throughout the night so can produce product 24 hours a day
Disadvantages of CAD/CAM:
- If computer problem, all data will be lost If not checked properly, the object created can go very wrong
- Can be very expensive
- Can be hard to do and handling needs training
- Since not manual, can be slightly irritating because if not familiar with technology, it is very hard to insure exactly what is wanted by the designer e.g. If wanted something engraved instead of cut, the line colour has to be changed into blue instead of red.
- Sometimes you can't do everything you want to because the tools aren't available
- Lots of people lost their jobs when CAD CAM originally came out
As you can see there has been a variety of changes to the CAD/CAM design to become what it is today.
stand
today I made a simple stand and mated it with my vase. it turned out so good and they match each other perfectly. I'm so excited and happy I've finished. then I printed it off :)
real thing
today I did my real vase and it ended up to be really pretty. I got a photo off the Internet for a idea and based it around there. it has a straight to and goes curvy.
practicing
today we practiced creating a vase. it was very ugly and I am sure I won't be using this vase! it's really fun using pro desktop and I really like it :)
Assignment :(
today we found out about our assignment. we have to write a 500 word essay on CAD/CAM Design and create a vase and stand
pro desktop
today we learnt how to write our name in our extruded and 3D object. we select the face we won't it on and create a new sketch and then press the write something button and write your message which I wrote 'Monique's Design' and then you click on how big and tall you want it.
Pro Desktop
Today we were on pro desktop and we learnt how to make a hole in our 3d extruded object. all you have to do is create a new sketch by selecting the face and go onto extrude profile but then tick subtract material and through to next face and then it does it :) it looks really cool at the end!
Saturday, August 25, 2012
Pro Desktop
today we started a new unit called pro desktop. we learnt how to create a circle or square and extrude it so it becomes a 3D shape :)
Tuesday, June 5, 2012
Desk Tidy Brief Assessment
1. Choose 2 machines that you used in the fabrication of your desk tidy. With these machines in mind, outline WPH&S considerations that must be adhered to when using these machines. Include photographs of your chosen machines (OnGuard may be an excellent resource for this question).
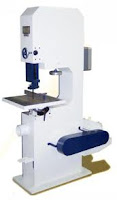
The machines that I used to make my product the best it could be is the band saw and the sanding machine. The workplace health and safety that has to be considered when using the band saw is to: always wear safety glasses in the shop, keep machine free of debris, no loose clothing (e.g. pull up long sleeves, no jackets), pin back long hair, make sure guide is on blade to prevent wandering of the cut, blade teeth should be pointing downwards be aware who’s in the machine shop and around your work place, no barefoot footwear (e.g. sandals) and always check with the teacher if unsure. The band saw was used for me to cut my acrylic square for the base of my iPad holder. The sander workplace health and safety issues that are to be taken into consideration is to always wear safety glasses with side shields or safety goggles, keep the work area free of debris, have the dust extracting system turned on and connected to the sander. Because of the dust created when sanding wood, the fire and explosion hazard is considerable, ensure that fire extinguishers are available and that persons working with the equipment know how to operate the extinguishers, make sure that the sanding belt tracks properly and loose fitting clothing should not be worn as well as to tie back long hair. The belt sander was used for me to cut my tube to make the stand for my iPad holder.

2. The material you are using for your desk tidy is called Polymethylmethacrylate (ACRYLIC). It has specific properties and uses. Choose 2 other common polymers and in table form give their industrial name, common name, properties and uses.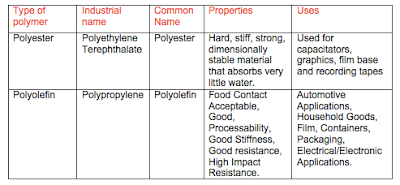
3. Extrusion, injection moulding, compression moulding, vacuum forming and laminating are examples of common manufacturing processes used with polymers (Plastics).
Choose one process and with the use of diagrams and bullet points outline the process. Specifically designed to facilitate the replacement of metal components with polymers, the compression moulding process is a method of moulding in which a preheated polymer is placed into an open, heated mould cavity. The mould is closed with a top plug and pressure is applied to force the material to contact all areas of the mould. Throughout the process heat and pressure are maintained until the polymer has cured.

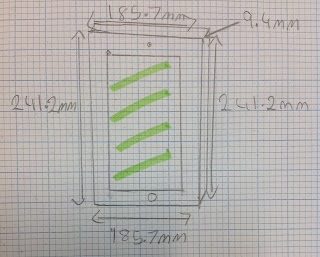
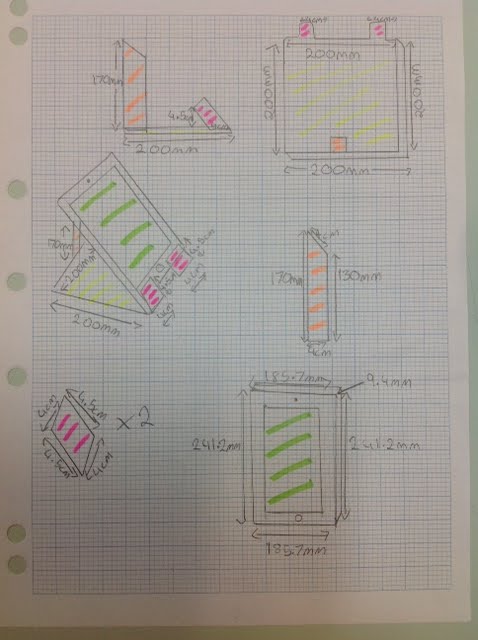
4. Extension Work - Using processes acquired from your maths lessons, calculate the amount of acrylic sheet that your FINAL desk tidy represents. Show all calculations; answer needs to be in square meters.
Square Base:
A= L x W
A= 200 x 200
A= 40, 000m²
Stand Holders:
A= L x W
A= 0.045 x 0.04
A= 0.000167225472m²
A= 40, 000m² + 0.000167225472m²= 40,000.00016723m²
∴ the amount of square meters used is 40,000.00016723m².
Evaluation
I am very delighted over my desk tidy which is a iPad holder because to be honest I thought there would have been a lot more problems to my design and things that wouldn’t be able to be solved but nothing like that happened! If there were tiny problems I was able to solve them in minutes. My iPad is able to stand up, doesn’t take up to much space and it is stable.
Function
My iPad stands role is to stand an iPad up and being able to use the iPad efficiently whilst it being in the iPad stand. This does what it is designed to do perfectly. There are no problems with my stand and it doesn’t need any mending. If I had to improve something it would be that I spray-painted the entire stand but I couldn’t do this the first time because the spray paint ran out.
Aesthetics
My stand is modern and up to date in the modern would industry. It is shaped very smartly and twenty-first-century. It was the little two things on the bottom to stop the iPad from falling are very smart, as it is not thought out a lot. I also like the tube the only colour on there as it would’ve just been plain but it stands out.
Ergonomics
My iPad stand is very ergonomic. It isn’t too big for a desk tidy and it isn’t all in your face with the colours. There is nothing I would change because it is very ergonomic and easy to work with. It is also very good because you can play on the iPad no matter what because nothing is in the way.
Economics
To make my iPad stand the total cost was $22.80, with:
• Plastic pipe at $4.90 per meter each.
• Acrylic at $17.90 each.
To make the iPad stand it took around 3-4 hours with 4 lessons. If I were to make the iPad stand again I would be quicker and more efficient with making it because I would know what to do and if there were any things I made a mistake with I could fix it easily and quickly. I would estimate the time it would take me to make it again to be 1-2 hours. The selling price I believe you could make a profit out of and be reasonable I would sell it at $18.00. This means I would make a profit of $5.20 but taking away the transport and packaging it would be around $2.30. I think this is good because it I sell a lot of them I would make a good business and stable profit.
The machines that I used to make my product the best it could be is the band saw and the sanding machine. The workplace health and safety that has to be considered when using the band saw is to: always wear safety glasses in the shop, keep machine free of debris, no loose clothing (e.g. pull up long sleeves, no jackets), pin back long hair, make sure guide is on blade to prevent wandering of the cut, blade teeth should be pointing downwards be aware who’s in the machine shop and around your work place, no barefoot footwear (e.g. sandals) and always check with the teacher if unsure. The band saw was used for me to cut my acrylic square for the base of my iPad holder. The sander workplace health and safety issues that are to be taken into consideration is to always wear safety glasses with side shields or safety goggles, keep the work area free of debris, have the dust extracting system turned on and connected to the sander. Because of the dust created when sanding wood, the fire and explosion hazard is considerable, ensure that fire extinguishers are available and that persons working with the equipment know how to operate the extinguishers, make sure that the sanding belt tracks properly and loose fitting clothing should not be worn as well as to tie back long hair. The belt sander was used for me to cut my tube to make the stand for my iPad holder.


2. The material you are using for your desk tidy is called Polymethylmethacrylate (ACRYLIC). It has specific properties and uses. Choose 2 other common polymers and in table form give their industrial name, common name, properties and uses.

3. Extrusion, injection moulding, compression moulding, vacuum forming and laminating are examples of common manufacturing processes used with polymers (Plastics).
Choose one process and with the use of diagrams and bullet points outline the process. Specifically designed to facilitate the replacement of metal components with polymers, the compression moulding process is a method of moulding in which a preheated polymer is placed into an open, heated mould cavity. The mould is closed with a top plug and pressure is applied to force the material to contact all areas of the mould. Throughout the process heat and pressure are maintained until the polymer has cured.

4. Extension Work - Using processes acquired from your maths lessons, calculate the amount of acrylic sheet that your FINAL desk tidy represents. Show all calculations; answer needs to be in square meters.
Square Base:
A= L x W
A= 200 x 200
A= 40, 000m²
Stand Holders:
A= L x W
A= 0.045 x 0.04
A= 0.000167225472m²
A= 40, 000m² + 0.000167225472m²= 40,000.00016723m²
∴ the amount of square meters used is 40,000.00016723m².
Evaluation
I am very delighted over my desk tidy which is a iPad holder because to be honest I thought there would have been a lot more problems to my design and things that wouldn’t be able to be solved but nothing like that happened! If there were tiny problems I was able to solve them in minutes. My iPad is able to stand up, doesn’t take up to much space and it is stable.
Function
My iPad stands role is to stand an iPad up and being able to use the iPad efficiently whilst it being in the iPad stand. This does what it is designed to do perfectly. There are no problems with my stand and it doesn’t need any mending. If I had to improve something it would be that I spray-painted the entire stand but I couldn’t do this the first time because the spray paint ran out.
Aesthetics
My stand is modern and up to date in the modern would industry. It is shaped very smartly and twenty-first-century. It was the little two things on the bottom to stop the iPad from falling are very smart, as it is not thought out a lot. I also like the tube the only colour on there as it would’ve just been plain but it stands out.
Ergonomics
My iPad stand is very ergonomic. It isn’t too big for a desk tidy and it isn’t all in your face with the colours. There is nothing I would change because it is very ergonomic and easy to work with. It is also very good because you can play on the iPad no matter what because nothing is in the way.
Economics
To make my iPad stand the total cost was $22.80, with:
• Plastic pipe at $4.90 per meter each.
• Acrylic at $17.90 each.
To make the iPad stand it took around 3-4 hours with 4 lessons. If I were to make the iPad stand again I would be quicker and more efficient with making it because I would know what to do and if there were any things I made a mistake with I could fix it easily and quickly. I would estimate the time it would take me to make it again to be 1-2 hours. The selling price I believe you could make a profit out of and be reasonable I would sell it at $18.00. This means I would make a profit of $5.20 but taking away the transport and packaging it would be around $2.30. I think this is good because it I sell a lot of them I would make a good business and stable profit.
Monday, May 14, 2012
YAY
yay it worked! MY design actually worked! Im so happy because it was exactly how i pictured it. Here is the before and afters.


little things count!
Today i went to check if my square i had cut out and my newly painted tube was all good! and it was perfect! so today mu aim was to get my little things to stop the iPad from falling cut out and to glue it all together.
The little things to stop the iPad from falling:
 the little things were hard to cut out because i had a big piece of clear acrylic but only had to cut out little things on the bandsaw. I cut them but sanded them to measurements. It was hard to make sure the things were the same size because it wouldn't work if it wasn't. When i got them the same i had to use the strip heater to bend them so it would glue to the square board. After i used the strip heater i had to glue everything together. I had to get one of my friends to help me because i had to make sure the width and length were the right place so i could fit my iPad in properly and on the right slant. It was hard but good. Lets see how it turns out next lesson!

Spraying!
this lesson i tried to make my tube to hold the iPad!
 that was what i was trying to make this lesson. I have to admit it was confusing and hard to try and get a handsaw to cut on a diagonal line through the plastic tube. but because it wasn't hitting the points i wanted i had to sand it down which was good so it could be basically perfect to what measurements i had and how tall and how much on a slant it would be. After i did that i had a little time to spare so i went down into the painting room and because the tubes are a horrible silver i wanted to make it more me so i spray painted it pink. It was fun but it could get very messy! after that i had to let it dry and just sit there for the lesson tomorrow.

Workshop!
This lesson i finally got to get to the workshop! it was fun because i got straight in there because i knew my measurements and everything so it was easier. I bring my sheet with the measurements on it and then i got one big clear piece of acrylic and cut out my big piece on the bandsaw. it was really scary at the start but i think that was because of how loud it was because as i started using it more i got used to it and didn't think it was scary at all!
Designing
In todays lesson i had to choose what design i was getting my ideas from and i chose the one with only one stand which is this one
 I thought this would be a much better option for me as my iPad cover case already has a stand but only a low one where as this design has a higher stance. Here are my drawings:


Creating Desk Tidy
Today in design futures we had to think of how we wanted to create our desk tidy. I searched for a few ideas and only a few caught my eye. I like these ones :

 I would like to choose these images because i got a new iPad and i wanted a stand to use so its easier to type while I'm at home so these ideas are for an iPad :)


Sunday, March 11, 2012
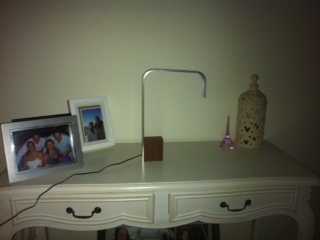
Finished Product!
Here i have the very finished product of my LED lamp!! Created by Monique Fullerton-Smith <3


Sunday, March 4, 2012
Assessment Questions & Answers.
1. What is the actual difference between lights of different colours?
- The primary colors are red, blue, and green. When all three are added, the full extent is present and the light is understood as "white". "Primary colors of light" can refer to the seven distinct wavelength ranges that exist in white light. Various combinations of wavelengths are present in colored light. The colours of objects are the result of the object surface absorbing one or more wavelengths, so that the reflected light does not contain all colors.
2. Define the following lighting terms: ambient light, direct light diffuser, luminosity, energy efficiency, watts
Ambient light: The soft indirect light that fills the volume of a room with illumination. It softens shadows on people's faces and creates an inviting glow in the room.
Direct light diffuser: Direct light diffusion is the scattering of direct light by making it pass through a non-transparent material or by bouncing it off a semi-reflective surface. Photographers to create “softer” light commonly use light diffusion. This is more flattering to photography subjects and casts fewer harsh, distracting shadows.
Luminosity: Luminosity is the total brightness of a star or other astronomical object. It is expressed in Watts and represents the total amount of energy that the object radiates each second over all wavelength regions of the electromagnetic spectrum. Luminosity is a physical property of the object and does not depend on the distance it is being observed from.
Energy efficiency: The most efficient products require the least energy to generate the most output. For example, compact fluorescent light bulbs use far less energy than typical incandescent lights while producing the same brightness; therefore they are more energy efficient. Engineers compute energy efficiency using a ratio, written as a decimal between 0 and 1.
Watts: The watt (symbol: W) is a derived unit of power in the International System of Units. It is the unit for measuring electrical power. It defines the rate of energy consumption by an electrical device when it is in operation. The energy cost of operating an electrical device is calculated as its wattage times the hours of use.
3. Comment on Global warming
Global warming is a gradual increase in the overall temperature of the earth's atmosphere generally attributed to the greenhouse effect caused by increased levels of carbon dioxide, CFCs, and other pollutants. Trapping excess carbon in Earth’s atmosphere causes climate change. This trapped carbon pollution heats up, altering the Earth's climate patterns. The largest source of this pollution is the burning of fossil fuels (such as coal and oil) for energy. Decades of climate science have found that if we fail to reduction carbon pollution, climate change will have profound impacts on our planet. Climate change isn’t just a temperature change. Australia’s environment and economy are particularly vulnerable to the effects of climate change. Some of these effects are already occurring.
4. How can the modern home become more energy efficient with regard to lighting?
Lighting can be responsible for up to 50% of energy costs. Good lighting does more than just illuminate an area. It can help homes with a variety of things like reduce running costs, improve the working environment, improve safety, improve aesthetics, improve colour rendering and reduce greenhouse gas emissions. Building automation systems can be installed to automatically control lights within buildings. These systems can operate on timers, motion detectors and other inputs to remove human error – for example, somebody forgetting to switch a light off – from the process.
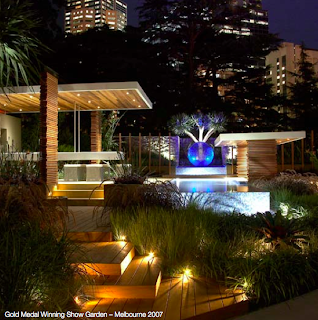
5. Research a modern-day lighting designer and comment on their contribution to the design world.
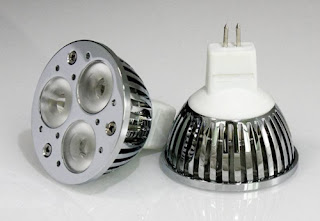
ME Lighting design, manufacture and install creative lighting solutions for indoor and outdoor living. Their new generation LED lighting is extremely versatile and can be used to provide many new and innovative solutions for indoors and for garden and landscape lighting. They have a wide range of LED lights to suit all your lighting needs. Application for their energy efficient creative lighting include:
• Strip Lighting (waterproof; non-waterproof)
• Water Features
• Down lights (indoor; outdoor)
• Paths/Decks/Stairs
• Trees & Plants
• T8 LED tubes
• Pool Landscapes
• MR16 replacement globes
• BBQs & Tables
• Traditional globe replacements
• Artwork
• Day Beds and more....
Here are some examples of ME lighting design projects:

Evaluation
I am very delighted over my LED eco lamp design because to be honest I thought there would have been a lot more problems to my design and things that wouldn’t be able to be solved but nothing like that happened! If there were tiny problems I was able to solve them in minutes. My lamp is standing up, producing light and stable.
Function
My LED eco lamps role to light up have done what it was designed to do. There is no problems with the device and doesn’t need any mending when the light is to be turned on. If I could improve something it would be to have a remote or switch on the cord to improve its working ability to be switched on instead of having to switch it on in the wall.
Aesthetics
My LED eco lamp is modern and up to date in the modern world industry. It is shaped very smartly and twenty-first-century. It was something to stabilize it which is the wood on the side which could be black but can be used and blend in with a lot of things. The shape is very soft and sharp at the same time. It could be used for peaceful things or very important functions.
Ergonomics
My LED eco lamp is very ergonomic. It gives off the right amount of light for a desk lamp, it isn’t to in your face bright that it blinds you but something that provides light that you could work with. There is nothing I would change because it is very ergonomic and easy to work with. Its also not to big so if there was a small desk it would fit perfectly.
Economics
To make my LED Eco Lamp the total cost was $15.75, with:
• Aluminum at $2.40 each
• Jarrah base at $2.40 each
• Heat shrink at $6 per 1 meter each
• L.E.D strip at $195.00 per 5 meters
• Plastic at $0.45
• Cord at $2.80
To make the lamp it took around 8-9 hours with 9 lessons. If I were to make the LED eco lamp again I would be quicker and more efficient with making it because I would know what to do and if there were any things I made a mistake with I could fix it easily and quickly. I would estimate the time it would take me to make it again to be 3-4 hours. The selling price I believe you could make a profit out of and be reasonable I would sell it at $25.00. This means I would make a profit of $9.25 but taking away the transport and packaging it would be around $5. I think this is good because it I sell a lot of them I would make a good business and stable profit.
- The primary colors are red, blue, and green. When all three are added, the full extent is present and the light is understood as "white". "Primary colors of light" can refer to the seven distinct wavelength ranges that exist in white light. Various combinations of wavelengths are present in colored light. The colours of objects are the result of the object surface absorbing one or more wavelengths, so that the reflected light does not contain all colors.
2. Define the following lighting terms: ambient light, direct light diffuser, luminosity, energy efficiency, watts
Ambient light: The soft indirect light that fills the volume of a room with illumination. It softens shadows on people's faces and creates an inviting glow in the room.
Direct light diffuser: Direct light diffusion is the scattering of direct light by making it pass through a non-transparent material or by bouncing it off a semi-reflective surface. Photographers to create “softer” light commonly use light diffusion. This is more flattering to photography subjects and casts fewer harsh, distracting shadows.
Luminosity: Luminosity is the total brightness of a star or other astronomical object. It is expressed in Watts and represents the total amount of energy that the object radiates each second over all wavelength regions of the electromagnetic spectrum. Luminosity is a physical property of the object and does not depend on the distance it is being observed from.
Energy efficiency: The most efficient products require the least energy to generate the most output. For example, compact fluorescent light bulbs use far less energy than typical incandescent lights while producing the same brightness; therefore they are more energy efficient. Engineers compute energy efficiency using a ratio, written as a decimal between 0 and 1.
Watts: The watt (symbol: W) is a derived unit of power in the International System of Units. It is the unit for measuring electrical power. It defines the rate of energy consumption by an electrical device when it is in operation. The energy cost of operating an electrical device is calculated as its wattage times the hours of use.
3. Comment on Global warming
Global warming is a gradual increase in the overall temperature of the earth's atmosphere generally attributed to the greenhouse effect caused by increased levels of carbon dioxide, CFCs, and other pollutants. Trapping excess carbon in Earth’s atmosphere causes climate change. This trapped carbon pollution heats up, altering the Earth's climate patterns. The largest source of this pollution is the burning of fossil fuels (such as coal and oil) for energy. Decades of climate science have found that if we fail to reduction carbon pollution, climate change will have profound impacts on our planet. Climate change isn’t just a temperature change. Australia’s environment and economy are particularly vulnerable to the effects of climate change. Some of these effects are already occurring.
4. How can the modern home become more energy efficient with regard to lighting?
Lighting can be responsible for up to 50% of energy costs. Good lighting does more than just illuminate an area. It can help homes with a variety of things like reduce running costs, improve the working environment, improve safety, improve aesthetics, improve colour rendering and reduce greenhouse gas emissions. Building automation systems can be installed to automatically control lights within buildings. These systems can operate on timers, motion detectors and other inputs to remove human error – for example, somebody forgetting to switch a light off – from the process.
5. Research a modern-day lighting designer and comment on their contribution to the design world.
ME Lighting design, manufacture and install creative lighting solutions for indoor and outdoor living. Their new generation LED lighting is extremely versatile and can be used to provide many new and innovative solutions for indoors and for garden and landscape lighting. They have a wide range of LED lights to suit all your lighting needs. Application for their energy efficient creative lighting include:
• Strip Lighting (waterproof; non-waterproof)
• Water Features
• Down lights (indoor; outdoor)
• Paths/Decks/Stairs
• Trees & Plants
• T8 LED tubes
• Pool Landscapes
• MR16 replacement globes
• BBQs & Tables
• Traditional globe replacements
• Artwork
• Day Beds and more....
Here are some examples of ME lighting design projects:


Evaluation
I am very delighted over my LED eco lamp design because to be honest I thought there would have been a lot more problems to my design and things that wouldn’t be able to be solved but nothing like that happened! If there were tiny problems I was able to solve them in minutes. My lamp is standing up, producing light and stable.
Function
My LED eco lamps role to light up have done what it was designed to do. There is no problems with the device and doesn’t need any mending when the light is to be turned on. If I could improve something it would be to have a remote or switch on the cord to improve its working ability to be switched on instead of having to switch it on in the wall.
Aesthetics
My LED eco lamp is modern and up to date in the modern world industry. It is shaped very smartly and twenty-first-century. It was something to stabilize it which is the wood on the side which could be black but can be used and blend in with a lot of things. The shape is very soft and sharp at the same time. It could be used for peaceful things or very important functions.
Ergonomics
My LED eco lamp is very ergonomic. It gives off the right amount of light for a desk lamp, it isn’t to in your face bright that it blinds you but something that provides light that you could work with. There is nothing I would change because it is very ergonomic and easy to work with. Its also not to big so if there was a small desk it would fit perfectly.
Economics
To make my LED Eco Lamp the total cost was $15.75, with:
• Aluminum at $2.40 each
• Jarrah base at $2.40 each
• Heat shrink at $6 per 1 meter each
• L.E.D strip at $195.00 per 5 meters
• Plastic at $0.45
• Cord at $2.80
To make the lamp it took around 8-9 hours with 9 lessons. If I were to make the LED eco lamp again I would be quicker and more efficient with making it because I would know what to do and if there were any things I made a mistake with I could fix it easily and quickly. I would estimate the time it would take me to make it again to be 3-4 hours. The selling price I believe you could make a profit out of and be reasonable I would sell it at $25.00. This means I would make a profit of $9.25 but taking away the transport and packaging it would be around $5. I think this is good because it I sell a lot of them I would make a good business and stable profit.
Wednesday, February 29, 2012
Learning!
in this lesson we had to learn about our assignment and our evaluation and what we had to do. this lesson was really helpful because i was actually not really understanding the evaluation questions but now i do. i took some notes and also noted that it was all on blackboard which is so helpful!
Soldering!
Today i soldered! i was a bit nervous at first seeming the tool is VERY hot and looks really scary to use!!! i used it and i couldn't get the hang of it at first because the solder wasn't staying on properly to the LED lights for some reason! but then it finally came along and did it. i was really proud of what i did but i accidentally put a bit too much solder on. Mr Ward said that it was okay and it wasn't going to make any difference as long as the light worked.
Friday, February 24, 2012
Helping Hand!
Today In Design Futures I made a hole for my wires. i also helped my friend, Isabella Coman because she had troubles sanding so i helped her do that because she was scared to. so i showed her how it was done and sanded her two sides on her triangle wood the i made her sand her surface and her third side. After that i showed her how to make all the holes for her wood, aluminium and then screw them together! she found it a bit scary at first but then she got used to it, just like me! After that and she was up to the part where i was up to. We went over and formed a line with mr ward so he could help us get started on drilling then he would look over us to make sure we were doing it safely. That was scary! this lesson was very productive and so fun!
Confused!
This lesson was not so good :( i accidentally got a bit confused with what was got to be done and i for some reason i took apart my lamp thinking i had to do that because my aluminium was turned inwards and i thought that because everyone else's was outwards i pulled it apart to try to put in a big hole for the wires but then mr Ward helped me and said to put it back together and then the bell went so i didn't have enough time to put one in :( at least it was a lesson learnt!
Saturday, February 18, 2012
Holes, Holes and more Holes!
in this lesson of design futures we got our aluminium and timber and we had to get these two objects somehow together. i thought maybe it was really really strong glue! but no its was screws which sounded a bit more smarter then mine...We had to use three different hand screws things. first we had to put our aluminium in a holder and screw holes in it. i had to use the big screw holier in the aluminium first. after i have done that i put the smallest screw holier in the timber. after i did that i got a screw and put the aluminium on the timber together and put the screw in. i started with a hand screwer then i used the hand machine screwer. i had to press down really hard to get it to stay in the screw! This was such a fun lesson because i had never used these devices before and using them was scary at first but sooo fun in the end!
Thursday, February 16, 2012
Bending and Twisting!
Today in Design Futures I got my alluminuim piece and my timber. i went to the bending bench where Mr. Ward helped people bend there aluminium, i bent mine like it went up straight and bent over. after that i went into the theory room and worked on my blog! it was interesting how we couldn't choose designs where it was sharp corners because the aluminium would go all funny for the wires and everything to go through, so we had to choose something with curves even if its simple its still going to look great! thats what Mr. Ward said :)
Wednesday, February 15, 2012
Theory Lesson!
In this lesson we got to choose if we worked in the workshop or we stayed in the theory room and worked on our assignments and blogs. I chose to do theory and work on my assignment and blog. it was really good doing this because i got a lot of class time to understand how the assignment is set out and i did one of my questions. i worked really well and next time i get to go into the workshop! yay!
Thursday, February 9, 2012
Wardies wonderful workshop tour.
Today in this lesson we got to have a tour of the workshop. We learnt a lot of things and these are some of the points.
Wardies wonderful workshop tour
- never use a machine if you are unaware of how to use it. Ask Mr Ward.
-always stay out of the yellow line if someone is using the machine.
-Always wear safety spectacles and a apron when in the yellow line.
-always place things back wear they came from.
This was a good lesson because then I know how to use machines and know how to stay safe within the workshop and work productively.
Tuesday, February 7, 2012
Lesson 3:
Today in Design Futures we chose our lamp we want to do and tried to design the shape with wire so we can get the idea of our shape that the lamp would be having. I changed the shape I was doing because I couldn't do such tight curls so I changed to a simpler design.
Monday, February 6, 2012
Lesson 2, 2012; Light!


In design futures lesson today l learnt about light as we are making lamps. I found out that light years means how far away the star or planet is. For example if a star explodes but it is 130 light years away then we would only on earth see it 130 years later! This lesson was actually really interesting and I enjoyed it and was engaged in the things we were learning about light! here are some examples of light. even though you can't see it or touch it, you can see the effects of it :)
Wednesday, February 1, 2012
Lesson 1; 2012

Today was my first lesson in Design Futures but third for others. Today I drew sketches for what I wanted my lamp to look like. I did a lot of variety's like straight, curvy, wavy even wrinkly and now i am just looking back and seeing which one stands out to me the most! The picture above is all the ones i have drawn. I hope by next lesson i have picked which one i like!
Subscribe to:
Comments (Atom)